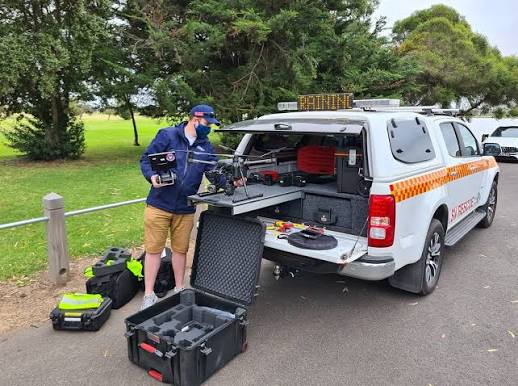
General Drone Preflight Checklist: A Complete Guide
A drone flight may take only a few minutes. However, even a short flight needs careful planning. A loose propeller, weak battery, poor signal, or sudden change in weather can put people and property at risk. That is why every pilot should complete a General Drone Preflight Checklist before takeoff. It helps pilots inspect the aircraft, check flight equipment, review weather conditions, and confirm that the flight area is safe.
Moreover, a clear preflight process helps teams follow the same safety steps before every flight. It also makes it easier to spot faults before they lead to an accident.
With eAuditor Audits & Inspections, organisations can use digital checklists to record drone inspections, document defects, and support follow-up actions. As a result, pilots and supervisors can manage preflight checks in a more organised way.
What Is a General Drone Preflight Checklist?
A General Drone Preflight Checklist is a structured list of checks that pilots complete before launching a drone. It helps confirm that the aircraft, batteries, controls, flight area, and safety equipment are ready for use.
The checklist may cover:
- Drone body and frame condition.
- Propellers, motors, and landing gear.
- Battery charge and physical condition.
- Remote controller and communication links.
- Camera, sensors, and navigation systems.
- Firmware and flight settings.
- Weather and visibility.
- Flight area and nearby obstacles.
- Pilot readiness and required permissions.
- Emergency plans and landing arrangements.
The exact checks depend on the drone model, flight purpose, operating environment, and local aviation rules. Therefore, pilots should always follow the manufacturer's instructions and applicable operating requirements.
Why Is a Drone Preflight Inspection Important?
A drone can fail because of a small issue that goes unnoticed. For example, a damaged propeller may affect flight stability, while a weak battery may shorten flight time.
A preflight inspection helps pilots find these problems before takeoff.
1. Improve Flight Safety
First, pilots can identify visible damage, loose parts, and equipment faults. They can then prevent an unsafe launch and arrange repairs when needed.
2. Protect People and Property
Drones often operate near buildings, roads, workers, and members of the public. A preflight check helps pilots review the area and identify possible risks before flight.
3. Reduce Equipment Damage
A faulty motor, damaged landing gear, or incorrect flight setting can cause a crash. Regular checks help pilots detect these issues before they damage the aircraft.
4. Check Battery Readiness
Battery problems can lead to unexpected power loss. Therefore, pilots should check battery condition, charge level, temperature, and secure fitting before every flight.
5. Improve Flight Planning
Weather, wind, obstacles, and airspace restrictions can affect a flight. A checklist helps pilots review these conditions and decide whether the flight can proceed safely.
6. Support Consistent Operations
When every pilot follows the same inspection process, teams can maintain consistent safety standards. In addition, supervisors can review completed checks and identify repeated issues.
General Drone Preflight Checklist: Key Inspection Areas
A good preflight checklist should cover the drone, its control equipment, the flight environment, and the pilot's readiness.
Use the following sections as a starting point. Adapt them to the drone model and the type of operation.
1. Drone Body and Frame Inspection
- Check the drone body for cracks, dents, and visible damage.
- Inspect the frame for loose or missing parts.
- Check the arms and joints for damage.
- Confirm that folding arms lock into position.
- Inspect landing gear for cracks or wear.
- Check that screws and fasteners are secure.
- Look for signs of water, dust, or chemical exposure.
- Confirm that covers and access panels are fitted correctly.
- Check that no foreign objects block vents or moving parts.
2. Propeller Inspection
Propellers create the lift needed for flight. Even minor damage can affect performance.
- Check each propeller for cracks and chips.
- Look for bends, warping, or worn edges.
- Confirm that propellers are clean.
- Check that each propeller is fitted to the correct motor.
- Confirm that locking mechanisms are secure.
- Check that propellers rotate freely when the manufacturer's instructions allow.
- Replace damaged propellers before flight.
- Confirm that no propeller has loose or missing parts.
Never attempt to repair a damaged propeller unless the manufacturer specifically permits the repair.
3. Motor Inspection
- Check each motor for visible damage.
- Look for dirt or debris around motor housings.
- Confirm that motors are securely mounted.
- Check for unusual resistance or movement.
- Look for signs of overheating or corrosion.
- Confirm that motor areas are clear.
- Check that motor guards are fitted where required.
If a motor makes unusual noise or shows signs of damage, do not launch the drone until a competent person checks it.
4. Battery Inspection
Battery condition has a direct effect on flight safety.
- Confirm that the battery is compatible with the drone.
- Check the battery charge level.
- Inspect the battery for swelling or deformation.
- Look for cracks, leaks, or damaged casing.
- Check battery contacts for dirt or corrosion.
- Confirm that the battery fits securely.
- Check that the battery temperature is within the manufacturer's limits.
- Confirm that spare batteries are stored safely.
- Review battery warnings or error messages.
Do not use a swollen, damaged, leaking, or otherwise unsafe battery.
5. Remote Controller Inspection
- Check the remote controller for visible damage.
- Confirm that the controller battery has enough charge.
- Inspect control sticks and buttons.
- Check that switches move correctly.
- Confirm that antennas are secure and correctly positioned.
- Check the screen or connected mobile device.
- Confirm that the control application starts correctly.
- Verify that the controller connects to the drone.
- Check that no warning messages appear.
6. Communication and Signal Checks
- Confirm that the remote controller links to the aircraft.
- Check the control signal strength.
- Verify the video transmission feed.
- Confirm that the antenna position follows the manufacturer's guidance.
- Check for possible sources of interference.
- Confirm that the selected control frequency and settings are suitable.
- Verify that the connection remains stable before takeoff.
Do not launch if the control link is unstable or the system reports a critical communication fault.
7. Camera and Sensor Inspection
For drones used in photography, mapping, surveying, or inspection, camera and sensor checks are also important.
- Check the camera lens for dirt or damage.
- Confirm that the camera is securely attached.
- Inspect gimbal arms and mounts.
- Confirm that the gimbal moves freely.
- Check sensor covers for dirt or obstruction.
- Verify that obstacle detection systems show no faults.
- Confirm that required sensors are calibrated according to the manufacturer's instructions.
- Check memory card availability and storage space.
- Confirm that the camera settings suit the planned task.
8. GPS and Navigation System Checks
- Confirm that the drone receives a reliable satellite signal where required.
- Check the GPS status.
- Verify the home point or return point.
- Confirm that the compass and other navigation systems show no warnings.
- Complete calibration only when required by the manufacturer.
- Check the planned flight route.
- Confirm that the drone's navigation settings are suitable.
- Review any positioning or navigation errors.
Do not rely on GPS alone to maintain safe separation from obstacles or people.
9. Firmware and Flight Settings
- Check for critical system warnings.
- Confirm that the drone and controller use compatible software versions.
- Review firmware status.
- Check the selected flight mode.
- Confirm maximum altitude and distance settings.
- Review return-to-home settings.
- Confirm the low-battery warning level.
- Check the loss-of-signal response.
- Verify obstacle avoidance settings where available.
- Confirm that the settings suit the planned flight and operating area.
Avoid installing updates immediately before an important operation unless the update is necessary and there is enough time to verify the system afterward.
10. Weather and Environmental Conditions
Weather can affect drone stability, visibility, battery performance, and control.
- Check current wind speed and direction.
- Review gust conditions.
- Check for rain, snow, or other precipitation.
- Review visibility.
- Check cloud and lighting conditions.
- Consider temperature limits.
- Look for signs of thunderstorms or approaching bad weather.
- Check for dust, sand, or strong air currents.
- Confirm that conditions remain within the manufacturer's operating limits.
Postpone the flight when weather conditions exceed safe operating limits.
11. Flight Area and Obstacle Assessment
- Check the takeoff and landing area.
- Identify trees, buildings, towers, and power lines.
- Look for cranes and other moving equipment.
- Check for nearby roads and pedestrian areas.
- Identify people and animals in the operating area.
- Review nearby airports and restricted airspace.
- Check for other aircraft or drone operations.
- Confirm that the flight path provides safe separation.
- Identify a suitable emergency landing area.
- Check that the area is suitable for the planned activity.
12. Pilot Readiness and Documentation
- Confirm that the pilot is fit to operate the drone.
- Check that the pilot has the required training.
- Verify applicable registration and authorisations.
- Review any required flight permissions.
- Confirm that the pilot understands the flight plan.
- Check that the pilot knows the emergency procedures.
- Confirm that required identification and contact details are available.
- Review site-specific operating rules.
- Confirm that the pilot can maintain the required visual contact or other approved operating method.
13. Emergency Equipment and Procedures
- Confirm that the emergency landing area is available.
- Review the lost-link procedure.
- Check the return-to-home response.
- Confirm that emergency contact details are available.
- Identify how to stop or terminate the flight safely when required.
- Check that a first aid kit is available where the operation requires one.
- Confirm that fire safety arrangements are suitable for the battery and operating environment.
- Make sure the team knows how to report an incident.
How to Conduct a Drone Preflight Inspection
A clear inspection process helps pilots complete checks in the right order. Follow these steps before each flight.
Step 1: Review the Flight Plan
Start by confirming the purpose of the flight. Identify the planned route, flight duration, operating area, and landing location.
Also, review any site rules and aviation requirements that apply to the operation.
Step 2: Check the Weather
Review wind, rain, visibility, and temperature. Compare the conditions with the drone manufacturer's limits and the applicable operating rules.
If conditions are unsafe, delay or cancel the flight.
Step 3: Inspect the Drone
Check the frame, arms, propellers, motors, and landing gear. Look for damage, loose parts, or signs of wear.
Next, inspect the battery and confirm that it is properly fitted.
Step 4: Check the Controller and Communication Link
Turn on the equipment according to the manufacturer's instructions. Confirm that the controller connects to the drone and that the video feed and control signal work as expected.
Do not proceed if critical connection warnings remain.
Step 5: Review Navigation and Flight Settings
Check GPS status, home point, flight mode, altitude limits, and return-to-home settings.
Also, confirm that the loss-of-signal response and low-battery settings are suitable for the flight.
Step 6: Inspect the Flight Area
Walk through the takeoff and landing area where practical. Identify obstacles, people, animals, power lines, and other hazards.
Then, confirm that the flight path and landing area remain safe.
Step 7: Confirm Pilot Readiness
Check that the pilot is trained, fit, and authorised for the planned operation. Make sure all required documents and permissions are available.
Step 8: Complete the Preflight Checklist
Record each inspection result. Mark any failed item and describe the issue.
If a safety-critical fault appears, do not take off until the issue has been resolved and the drone has passed the required checks.
Step 9: Conduct Final Takeoff Checks
Before launch, confirm that the area is clear and that people are at a safe distance. Check the drone's status indicators and verify that no critical warnings remain.
Then, take off only when all required conditions are met.
Step 10: Record and Review Findings
Keep a record of the completed inspection. Report defects, battery issues, and unusual system warnings.
Finally, arrange maintenance or further checks when needed.
Common Drone Preflight Mistakes to Avoid
Even experienced pilots can overlook simple checks when they are in a hurry. Avoid these common mistakes to improve flight safety.
1. Skipping Propeller Checks
A small crack or loose fitting can affect flight stability. Inspect every propeller before launch and replace damaged parts.
2. Ignoring Battery Damage
A battery may show signs of swelling or physical damage even when it has enough charge. Check its condition as well as its charge level.
3. Overlooking Weather Changes
Weather can change between planning and takeoff. Review current conditions again before launching.
4. Failing to Check the Return-to-Home Point
An incorrect home point can create problems during an emergency return. Confirm the location and settings before flight.
5. Ignoring System Warnings
Do not dismiss critical warnings to save time. Understand the warning and follow the manufacturer's troubleshooting guidance.
6. Flying Without Checking the Area
A clear launch point does not mean the entire flight path is safe. Check for obstacles, people, restricted areas, and other aircraft.
7. Using an Outdated Checklist
Drone models and operating procedures can change. Review checklist content when equipment, software, regulations, or flight conditions change.
8. Failing to Record Defects
A verbal report may not provide enough information for maintenance teams. Record the issue and make sure the drone is not returned to service until it is safe.
Best Practices for Effective Drone Preflight Inspections
A reliable preflight process depends on clear instructions and consistent checks.
- Follow the manufacturer’s checklist: Use the official instructions for the specific drone model.
- Inspect before every flight: Do not assume that a drone is safe because it worked during the previous flight.
- Use a consistent inspection order: Check the aircraft, batteries, controller, flight area, and pilot readiness in a repeatable sequence.
- Check batteries carefully: Review physical condition, charge, temperature, and storage practices.
- Review weather close to takeoff: Conditions may change during preparation.
- Confirm flight permissions: Check the rules and approvals that apply to the location and operation.
- Keep firmware and settings under control: Review system status and verify settings after approved updates.
- Train pilots regularly: Make sure pilots understand the drone, its limitations, and emergency procedures.
- Record all defects: Include clear descriptions and supporting evidence where appropriate.
- Remove unsafe drones from service: Do not allow damaged equipment to return to operation without the required checks.
- Review incidents and near misses: Use lessons from previous flights to improve inspection procedures.
- Update checklists when needed: Review them after equipment changes, new risks, or changes in operating requirements.
How eAuditor Audits & Inspections Supports Drone Preflight Checks
Paper checklists can be difficult to manage when an organisation operates several drones or has pilots working across different locations. In addition, handwritten records can make it harder to track defects and confirm follow-up actions.
eAuditor Audits & Inspections can help organisations manage drone preflight inspections through configurable digital checklists. Teams can use these checklists to record equipment condition, review flight readiness, document defects, and support corrective action follow-up.
Here are some ways the platform can support drone inspection processes.
1. Create Digital Drone Preflight Checklists
Build a checklist around your drone models and operating procedures. Include questions for propellers, motors, batteries, controllers, navigation systems, weather, and flight area conditions.
This helps pilots follow a consistent inspection process before takeoff.
2. Standardise Inspections Across Teams
Create a common checklist structure for pilots and supervisors. You can also adapt checklist questions for different drone types or activities.
For example, a drone used for aerial photography may need different camera checks from a drone used for industrial inspections.
3. Record Defects and Inspection Findings
Pilots can document failed checks and describe equipment issues. Where enabled, they can also attach photos or other supporting evidence.
This helps maintenance teams understand the problem before they assess the equipment.
4. Support Corrective Action Follow-Up
Record defects that need attention and assign follow-up actions through the available workflow features. Teams can use these records to monitor responsibility and review progress.
For safety-critical faults, organisations should also apply their own procedures to prevent the drone from being used until it has been cleared for service.
5. Improve Inspection Recordkeeping
Digital records help authorised users review completed preflight checks and reported issues. This can make it easier to track inspection history and identify repeated equipment problems.
6. Adapt Checklists to Different Operations
Different drone activities involve different risks. A construction site flight may need additional checks for cranes and workers, while an agricultural flight may need checks for chemicals, crops, and nearby people.
Configurable checklists help teams adapt their inspection process to the work being performed.
7. Support Safety Reviews
Managers can review recorded findings and follow-up actions to identify common problems. They can then use these records to improve training, maintenance planning, and inspection procedures.
eAuditor supports the inspection and recordkeeping process. However, it does not replace the drone manufacturer's instructions, pilot training, aviation approvals, technical maintenance, or an operator's legal responsibilities. Organisations must configure their checklists to match their equipment, flight activities, and applicable aviation rules.
Benefits of Using a Digital Drone Preflight Checklist
A digital checklist can help pilots and managers manage inspections in a more organised way.
Key benefits include:
- Consistent checks: Pilots can follow the same inspection process before each flight. https://eauditor.app/2026/11/15/general-drone-preflight-checklist-a-complete-guide/


Comments
Post a Comment